


ಐಫೋನ್ "ಸರ್ವರ್ ಗುರುತನ್ನು ಪರಿಶೀಲಿಸಲು ಸಾಧ್ಯವಿಲ್ಲ" ಎಂಬ ದೋಷವನ್ನು ಸರಿಪಡಿಸಲು ಉತ್ತಮ ಪರಿಹಾರಗಳು
ಐಫೋನ್ ತನ್ನ ಸುಗಮ ಮತ್ತು ಸುರಕ್ಷಿತ ಬಳಕೆದಾರ ಅನುಭವಕ್ಕೆ ಹೆಸರುವಾಸಿಯಾಗಿದೆ, ಆದರೆ ಯಾವುದೇ ಸ್ಮಾರ್ಟ್ ಸಾಧನದಂತೆ, ಇದು ಸಾಂದರ್ಭಿಕ ದೋಷಗಳಿಗೆ ನಿರೋಧಕವಲ್ಲ. ಐಫೋನ್ ಬಳಕೆದಾರರು ಎದುರಿಸುವ ಹೆಚ್ಚು ಗೊಂದಲಮಯ ಮತ್ತು ಸಾಮಾನ್ಯ ಸಮಸ್ಯೆಗಳಲ್ಲಿ ಒಂದು ಭಯಾನಕ ಸಂದೇಶವಾಗಿದೆ: "ಸರ್ವರ್ ಗುರುತನ್ನು ಪರಿಶೀಲಿಸಲು ಸಾಧ್ಯವಿಲ್ಲ." ನಿಮ್ಮ ಇಮೇಲ್ ಅನ್ನು ಪ್ರವೇಶಿಸಲು, ಸಫಾರಿಯಲ್ಲಿ ವೆಬ್ಸೈಟ್ ಬ್ರೌಸ್ ಮಾಡಲು ಅಥವಾ SSL (ಸುರಕ್ಷಿತ ಸಾಕೆಟ್ ಲೇಯರ್) ಬಳಸಿಕೊಂಡು ಯಾವುದೇ ಸೇವೆಗೆ ಸಂಪರ್ಕಿಸಲು ಪ್ರಯತ್ನಿಸುವಾಗ ಈ ದೋಷ ಸಾಮಾನ್ಯವಾಗಿ ಪಾಪ್ ಅಪ್ ಆಗುತ್ತದೆ.
ನಿಮ್ಮ ಐಫೋನ್ ಸರ್ವರ್ನ SSL ಪ್ರಮಾಣಪತ್ರವನ್ನು ಮೌಲ್ಯೀಕರಿಸಲು ಪ್ರಯತ್ನಿಸಿದಾಗ ಏನಾದರೂ ತಪ್ಪಾಗಿದೆ ಎಂದು ಕಂಡುಕೊಂಡಾಗ ಈ ಸಂದೇಶ ಕಾಣಿಸಿಕೊಳ್ಳುತ್ತದೆ - ಪ್ರಮಾಣಪತ್ರವು ಅವಧಿ ಮೀರಿದೆಯೇ, ಹೊಂದಿಕೆಯಾಗುತ್ತಿಲ್ಲವೇ, ವಿಶ್ವಾಸಾರ್ಹವಾಗಿಲ್ಲವೇ ಅಥವಾ ಮೂರನೇ ವ್ಯಕ್ತಿಯಿಂದ ಅಡ್ಡಿಪಡಿಸಲ್ಪಟ್ಟಿದೆಯೇ. ಇದು ಭದ್ರತಾ ಕಾಳಜಿಯಂತೆ ತೋರುತ್ತಿದ್ದರೂ, ಇದು ಸಾಮಾನ್ಯವಾಗಿ ಸಣ್ಣ ಸೆಟ್ಟಿಂಗ್ಗಳು ಅಥವಾ ನೆಟ್ವರ್ಕ್-ಸಂಬಂಧಿತ ಸಮಸ್ಯೆಗಳಿಂದ ಉಂಟಾಗುತ್ತದೆ.
ಈ ಮಾರ್ಗದರ್ಶಿಯಲ್ಲಿ, ನಿಮ್ಮ ಐಫೋನ್ನಲ್ಲಿ "ಸರ್ವರ್ ಗುರುತನ್ನು ಪರಿಶೀಲಿಸಲು ಸಾಧ್ಯವಿಲ್ಲ" ಸಮಸ್ಯೆಯನ್ನು ಪರಿಹರಿಸಲು ಮತ್ತು ಎಲ್ಲವೂ ಮತ್ತೆ ಸರಾಗವಾಗಿ ಕಾರ್ಯನಿರ್ವಹಿಸುವಂತೆ ಮಾಡಲು ಉತ್ತಮ ಪರಿಹಾರಗಳನ್ನು ನೀವು ಕಲಿಯುವಿರಿ.
1. ಐಫೋನ್ "ಸರ್ವರ್ ಗುರುತನ್ನು ಪರಿಶೀಲಿಸಲು ಸಾಧ್ಯವಿಲ್ಲ" ದೋಷವನ್ನು ಪರಿಹರಿಸಲು ಜನಪ್ರಿಯ ಪರಿಣಾಮಕಾರಿ ಪರಿಹಾರಗಳು
ತ್ವರಿತ ಮರುಪ್ರಾರಂಭಗಳಿಂದ ಹಿಡಿದು ಹೆಚ್ಚು ಆಳವಾದ ಹೊಂದಾಣಿಕೆಗಳವರೆಗೆ ನೀವು ಪ್ರಯತ್ನಿಸಬಹುದಾದ ಹಲವಾರು ಪರಿಣಾಮಕಾರಿ ಪರಿಹಾರಗಳು ಕೆಳಗೆ ಇವೆ.
1) ನಿಮ್ಮ ಐಫೋನ್ ಅನ್ನು ಮರುಪ್ರಾರಂಭಿಸಿ
ಸರಳವಾದ ಮರುಪ್ರಾರಂಭದೊಂದಿಗೆ ಪ್ರಾರಂಭಿಸಿ - ನಿಮ್ಮ ಐಫೋನ್ ಅನ್ನು ಆಫ್ ಮಾಡಲು ಸ್ಲೈಡ್ ಮಾಡಿ, ಕೆಲವು ಸೆಕೆಂಡುಗಳು ಕಾಯಿರಿ, ನಂತರ ಅದನ್ನು ಮತ್ತೆ ಆನ್ ಮಾಡಿ.
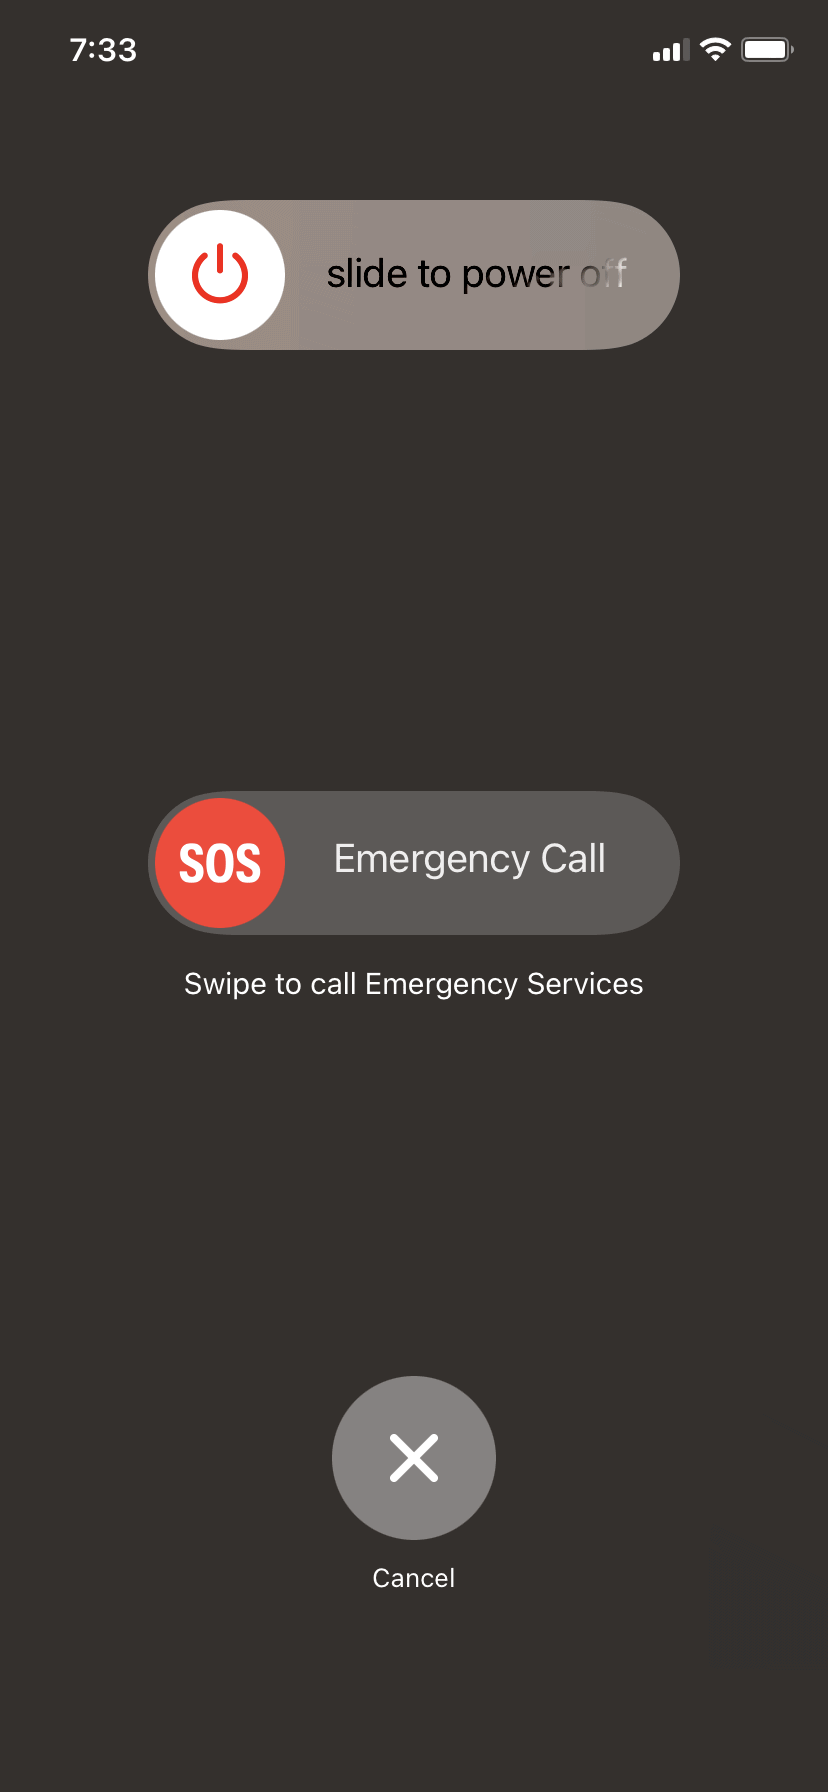
ಇದು ಏಕೆ ಕೆಲಸ ಮಾಡುತ್ತದೆ: ತಾತ್ಕಾಲಿಕ ಸಾಫ್ಟ್ವೇರ್ ದೋಷಗಳು ಕೆಲವೊಮ್ಮೆ SSL ಪ್ರಮಾಣಪತ್ರಗಳನ್ನು ಪರಿಶೀಲಿಸುವಲ್ಲಿ ಹಸ್ತಕ್ಷೇಪ ಮಾಡಬಹುದು.
2) ಏರ್ಪ್ಲೇನ್ ಮೋಡ್ ಅನ್ನು ಟಾಗಲ್ ಮಾಡಿ
ತೆರೆಯಲು ಕೆಳಗೆ ಸ್ವೈಪ್ ಮಾಡಿ
ನಿಯಂತ್ರಣ ಕೇಂದ್ರ
, ಟ್ಯಾಪ್ ಮಾಡಿ
ಏರ್ಪ್ಲೇನ್ ಮೋಡ್
ಐಕಾನ್, 10 ಸೆಕೆಂಡುಗಳು ಕಾಯಿರಿ, ತದನಂತರ ಅದನ್ನು ಆಫ್ ಮಾಡಿ.
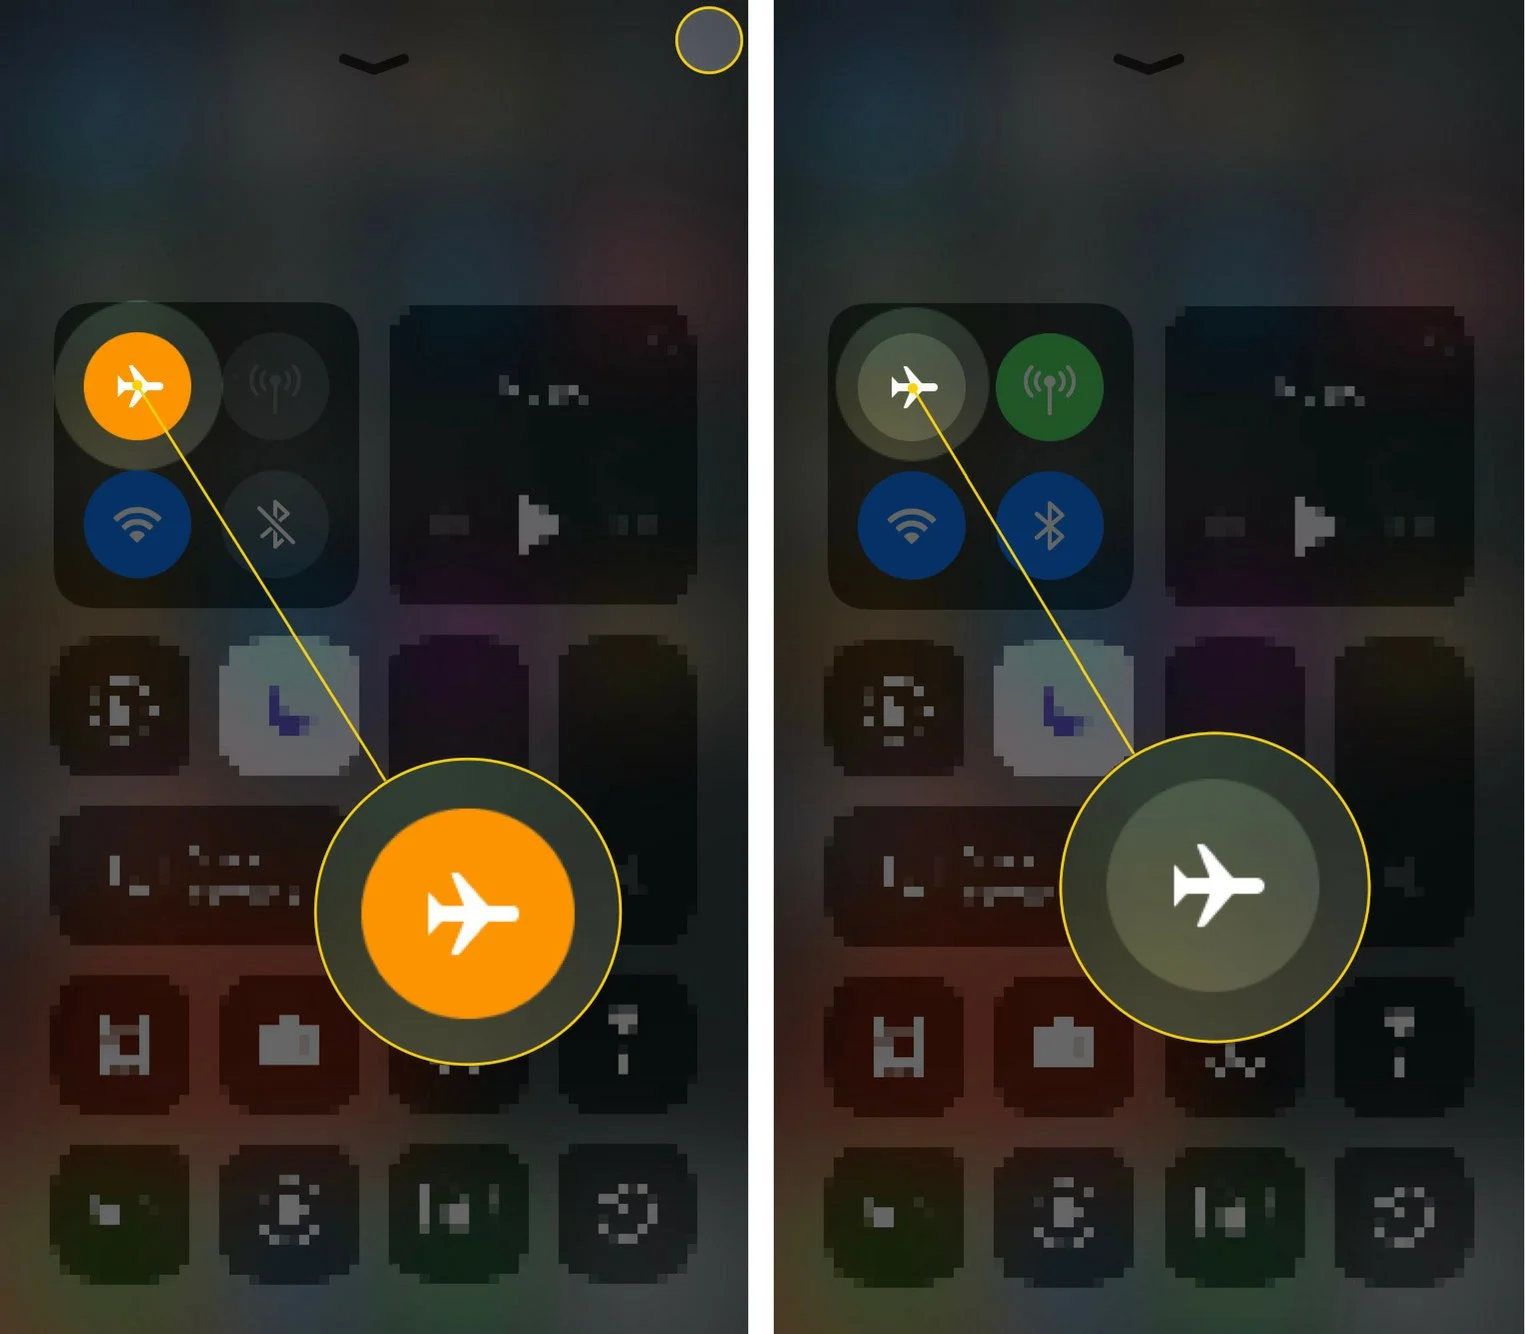
ಈ ಕ್ರಿಯೆಯು ನಿಮ್ಮ ಸಂಪರ್ಕವನ್ನು ಮರುಹೊಂದಿಸುತ್ತದೆ, ಇದು ಸರ್ವರ್ ಪರಿಶೀಲನೆಗೆ ಸಂಬಂಧಿಸಿದ ಸಮಸ್ಯೆಗಳನ್ನು ಪರಿಹರಿಸಬಹುದು.
3) ಇತ್ತೀಚಿನ ಆವೃತ್ತಿಗೆ iOS ಅನ್ನು ನವೀಕರಿಸಿ
ಆಪಲ್ನ ನವೀಕರಣಗಳು ಹೆಚ್ಚಾಗಿ ಭದ್ರತೆ ಮತ್ತು ಪ್ರಮಾಣಪತ್ರ ಸುಧಾರಣೆಗಳನ್ನು ಒಳಗೊಂಡಿರುತ್ತವೆ - ಕೇವಲ ಹೋಗಿ
ಸೆಟ್ಟಿಂಗ್ಗಳು > ಸಾಮಾನ್ಯ > ಸಾಫ್ಟ್ವೇರ್ ನವೀಕರಣ
ಮತ್ತು ಟ್ಯಾಪ್ ಮಾಡಿ
ಡೌನ್ಲೋಡ್ ಮಾಡಿ ಮತ್ತು ಸ್ಥಾಪಿಸಿ
ಒಂದು ವೇಳೆ ಲಭ್ಯವಿದ್ದರೆ.
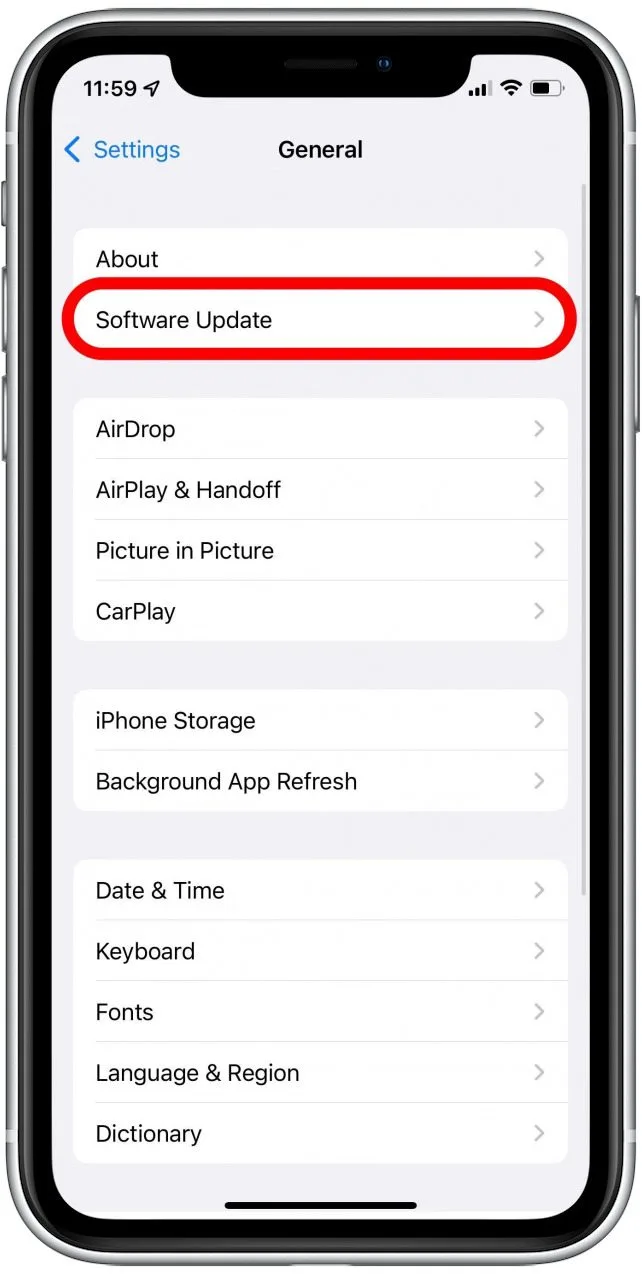
ಇದು ಏಕೆ ಕೆಲಸ ಮಾಡುತ್ತದೆ: ಹಳೆಯ iOS ಆವೃತ್ತಿಗಳು ನವೀಕರಿಸಿದ ಅಥವಾ ಹೊಸ SSL ಪ್ರಮಾಣಪತ್ರಗಳನ್ನು ಗುರುತಿಸದಿರಬಹುದು.
4) ನಿಮ್ಮ ಇಮೇಲ್ ಖಾತೆಯನ್ನು ಅಳಿಸಿ ಮತ್ತು ಮತ್ತೆ ಸೇರಿಸಿ
ಮೇಲ್ ಅಪ್ಲಿಕೇಶನ್ ಈ ಸಮಸ್ಯೆಯನ್ನು ಪ್ರದರ್ಶಿಸಿದರೆ, ಖಾತೆಯನ್ನು ತೆಗೆದುಹಾಕಿ ಮತ್ತೆ ಸೇರಿಸಲು ಪ್ರಯತ್ನಿಸಿ.
ಗೆ ಹೋಗಿ
ಸೆಟ್ಟಿಂಗ್ಗಳು > ಮೇಲ್ > ಖಾತೆಗಳು
, ಸಮಸ್ಯಾತ್ಮಕ ಖಾತೆಯನ್ನು ಆಯ್ಕೆಮಾಡಿ, ಟ್ಯಾಪ್ ಮಾಡಿ
ಖಾತೆಯನ್ನು ಅಳಿಸಿ
, ನಂತರ ಹಿಂತಿರುಗಿ
ಖಾತೆ ಸೇರಿಸಿ
ಮತ್ತು ನಿಮ್ಮ ಲಾಗಿನ್ ವಿವರಗಳನ್ನು ನಮೂದಿಸಿ.
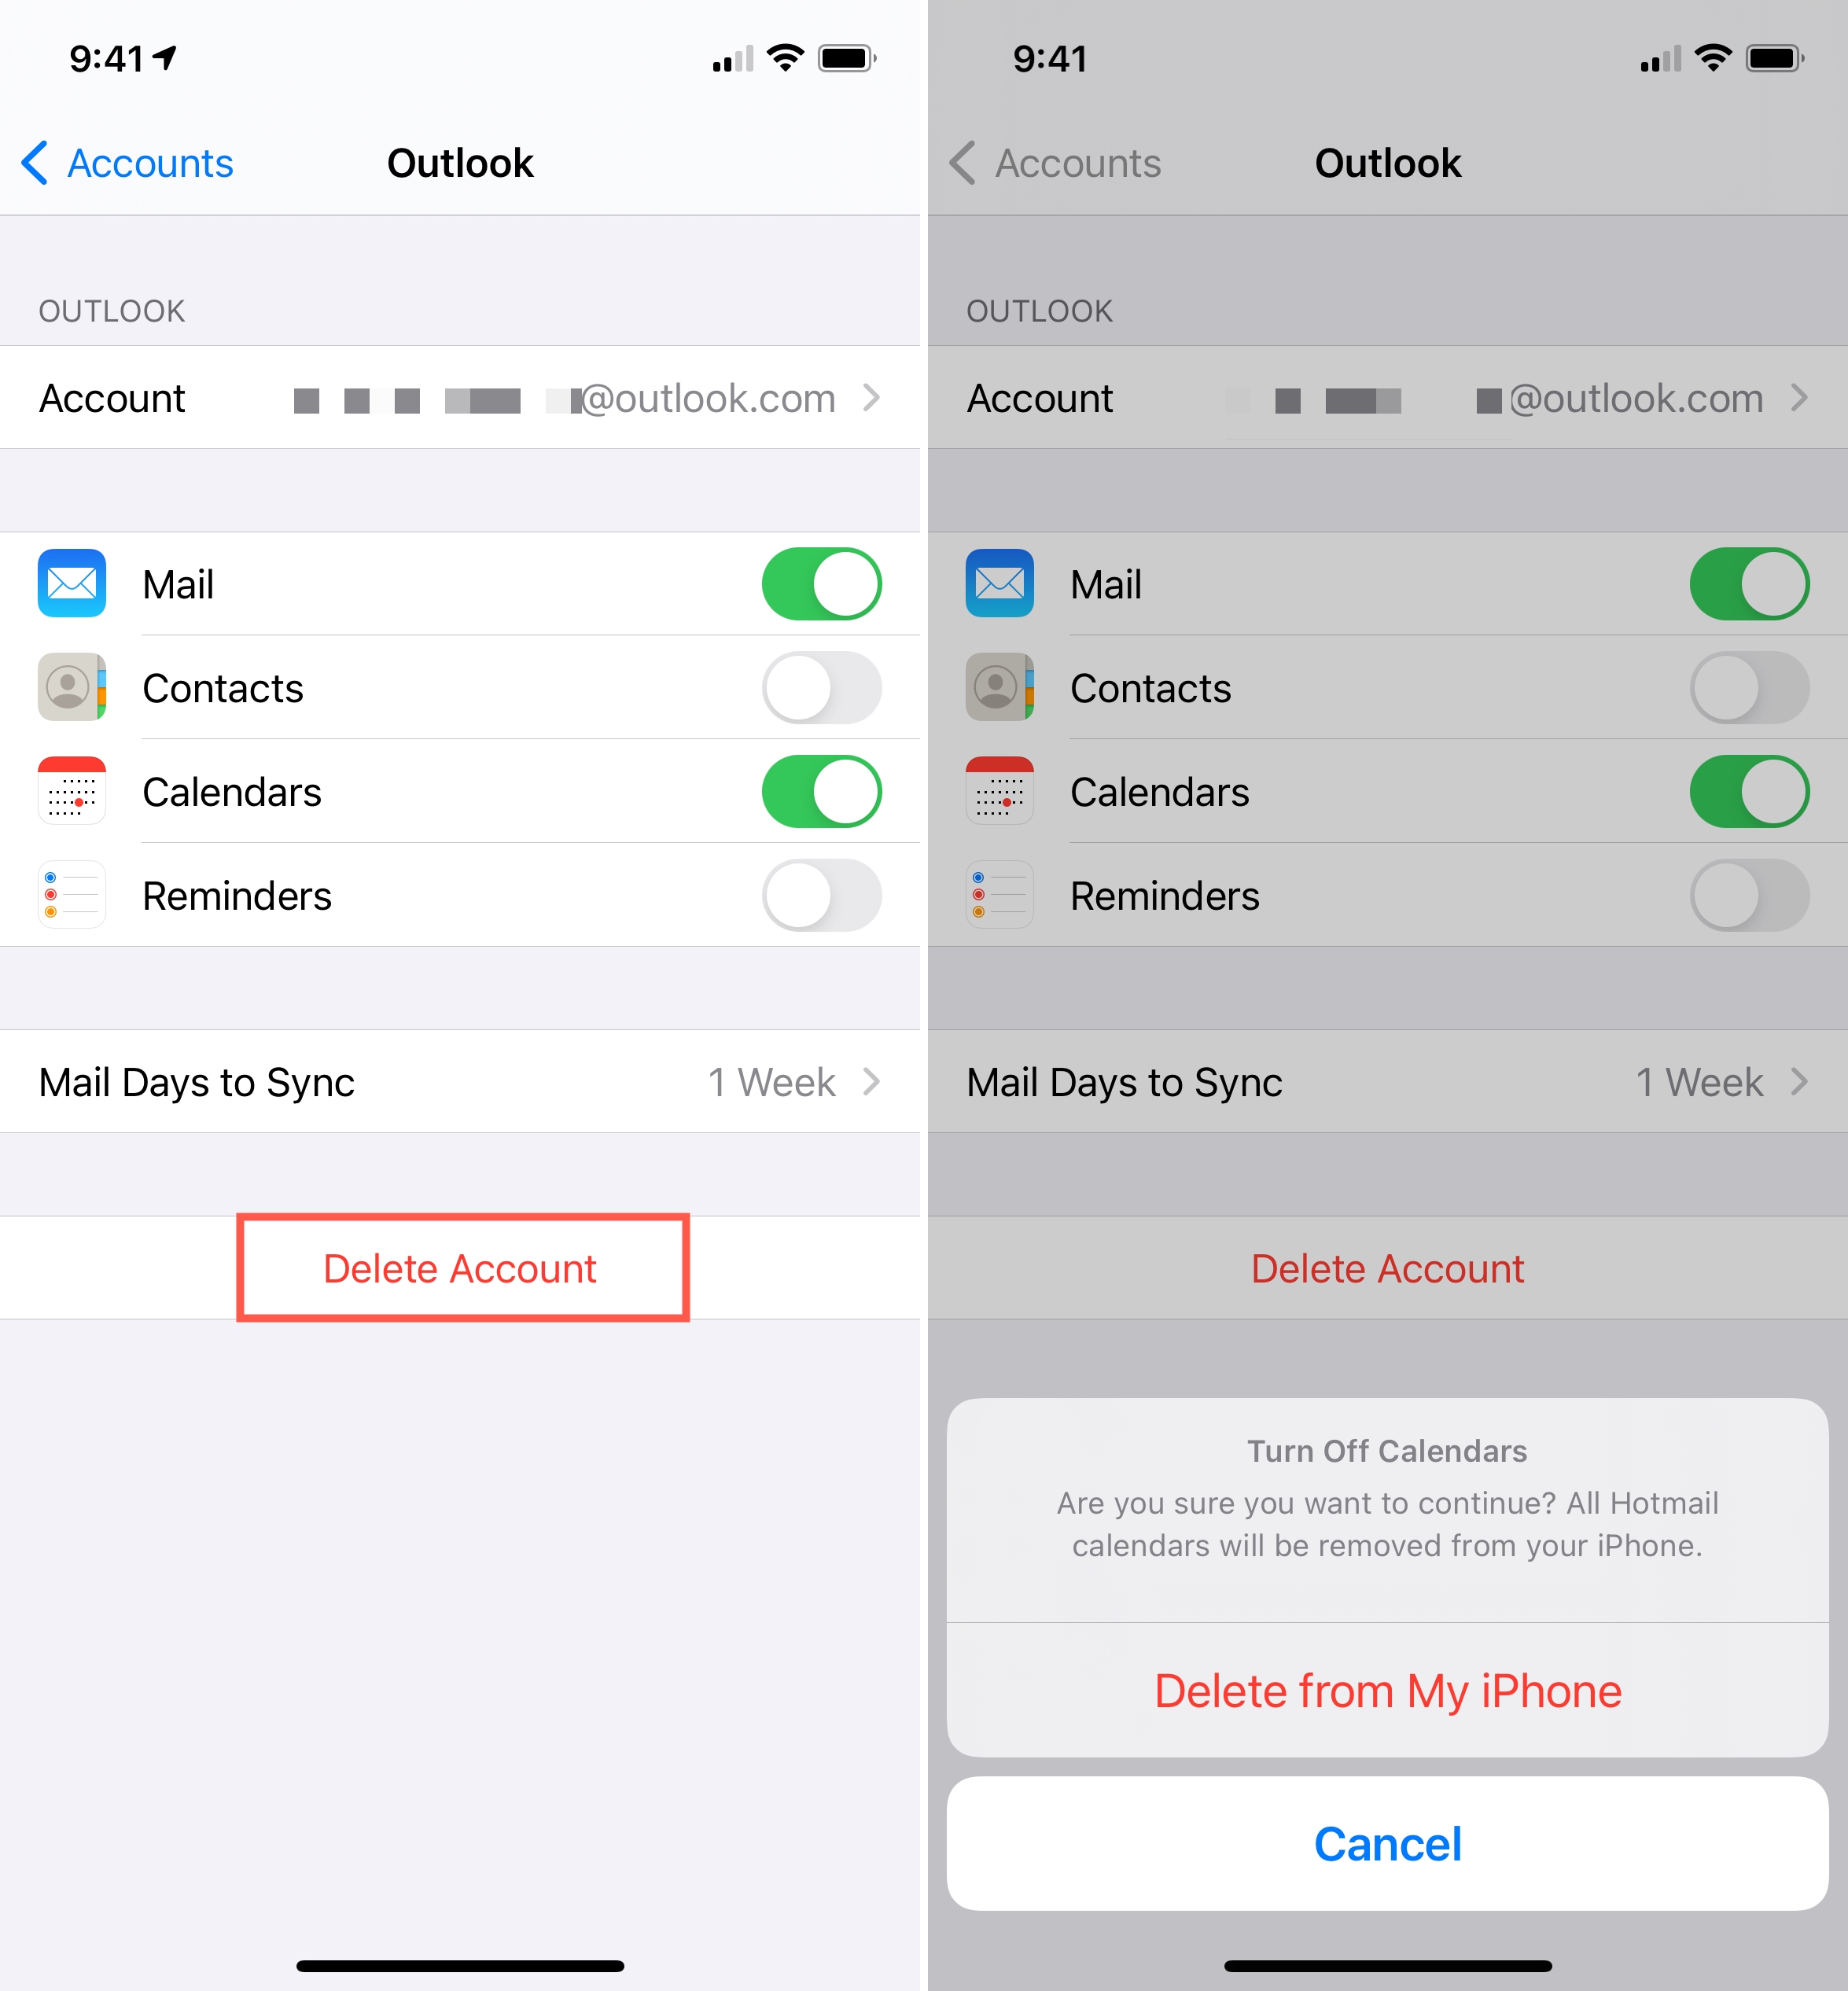
ಇದು ಏಕೆ ಕೆಲಸ ಮಾಡುತ್ತದೆ: ದೋಷಪೂರಿತ ಅಥವಾ ಹಳೆಯ ಇಮೇಲ್ ಕಾನ್ಫಿಗರೇಶನ್ SSL ಹೊಂದಾಣಿಕೆಯಲ್ಲಿ ಅಡಚಣೆಗಳನ್ನು ಉಂಟುಮಾಡಬಹುದು. ಮರು-ಸೇರಿಸುವುದರಿಂದ ಇದು ಸ್ಪಷ್ಟವಾಗುತ್ತದೆ.
5) ನೆಟ್ವರ್ಕ್ ಸೆಟ್ಟಿಂಗ್ಗಳನ್ನು ಮರುಹೊಂದಿಸಿ
SSL ಸಂವಹನಗಳಲ್ಲಿ ನೆಟ್ವರ್ಕ್ ಸೆಟ್ಟಿಂಗ್ಗಳು ಪ್ರಮುಖ ಪಾತ್ರವಹಿಸುತ್ತವೆ.
- ಗೆ ನ್ಯಾವಿಗೇಟ್ ಮಾಡಿ ಸೆಟ್ಟಿಂಗ್ಗಳು > ಸಾಮಾನ್ಯ > ಐಫೋನ್ ವರ್ಗಾಯಿಸಿ ಅಥವಾ ಮರುಹೊಂದಿಸಿ > ಮರುಹೊಂದಿಸಿ > ನೆಟ್ವರ್ಕ್ ಸೆಟ್ಟಿಂಗ್ಗಳನ್ನು ಮರುಹೊಂದಿಸಿ .

ಇದು ಉಳಿಸಲಾದ Wi-Fi ನೆಟ್ವರ್ಕ್ಗಳು ಮತ್ತು VPN ಸೆಟ್ಟಿಂಗ್ಗಳನ್ನು ಅಳಿಸುತ್ತದೆ, ಆದ್ದರಿಂದ ನೀವು ಆ ಮಾಹಿತಿಯನ್ನು ಬ್ಯಾಕಪ್ ಮಾಡಿದ್ದೀರಿ ಎಂದು ಖಚಿತಪಡಿಸಿಕೊಳ್ಳಿ.
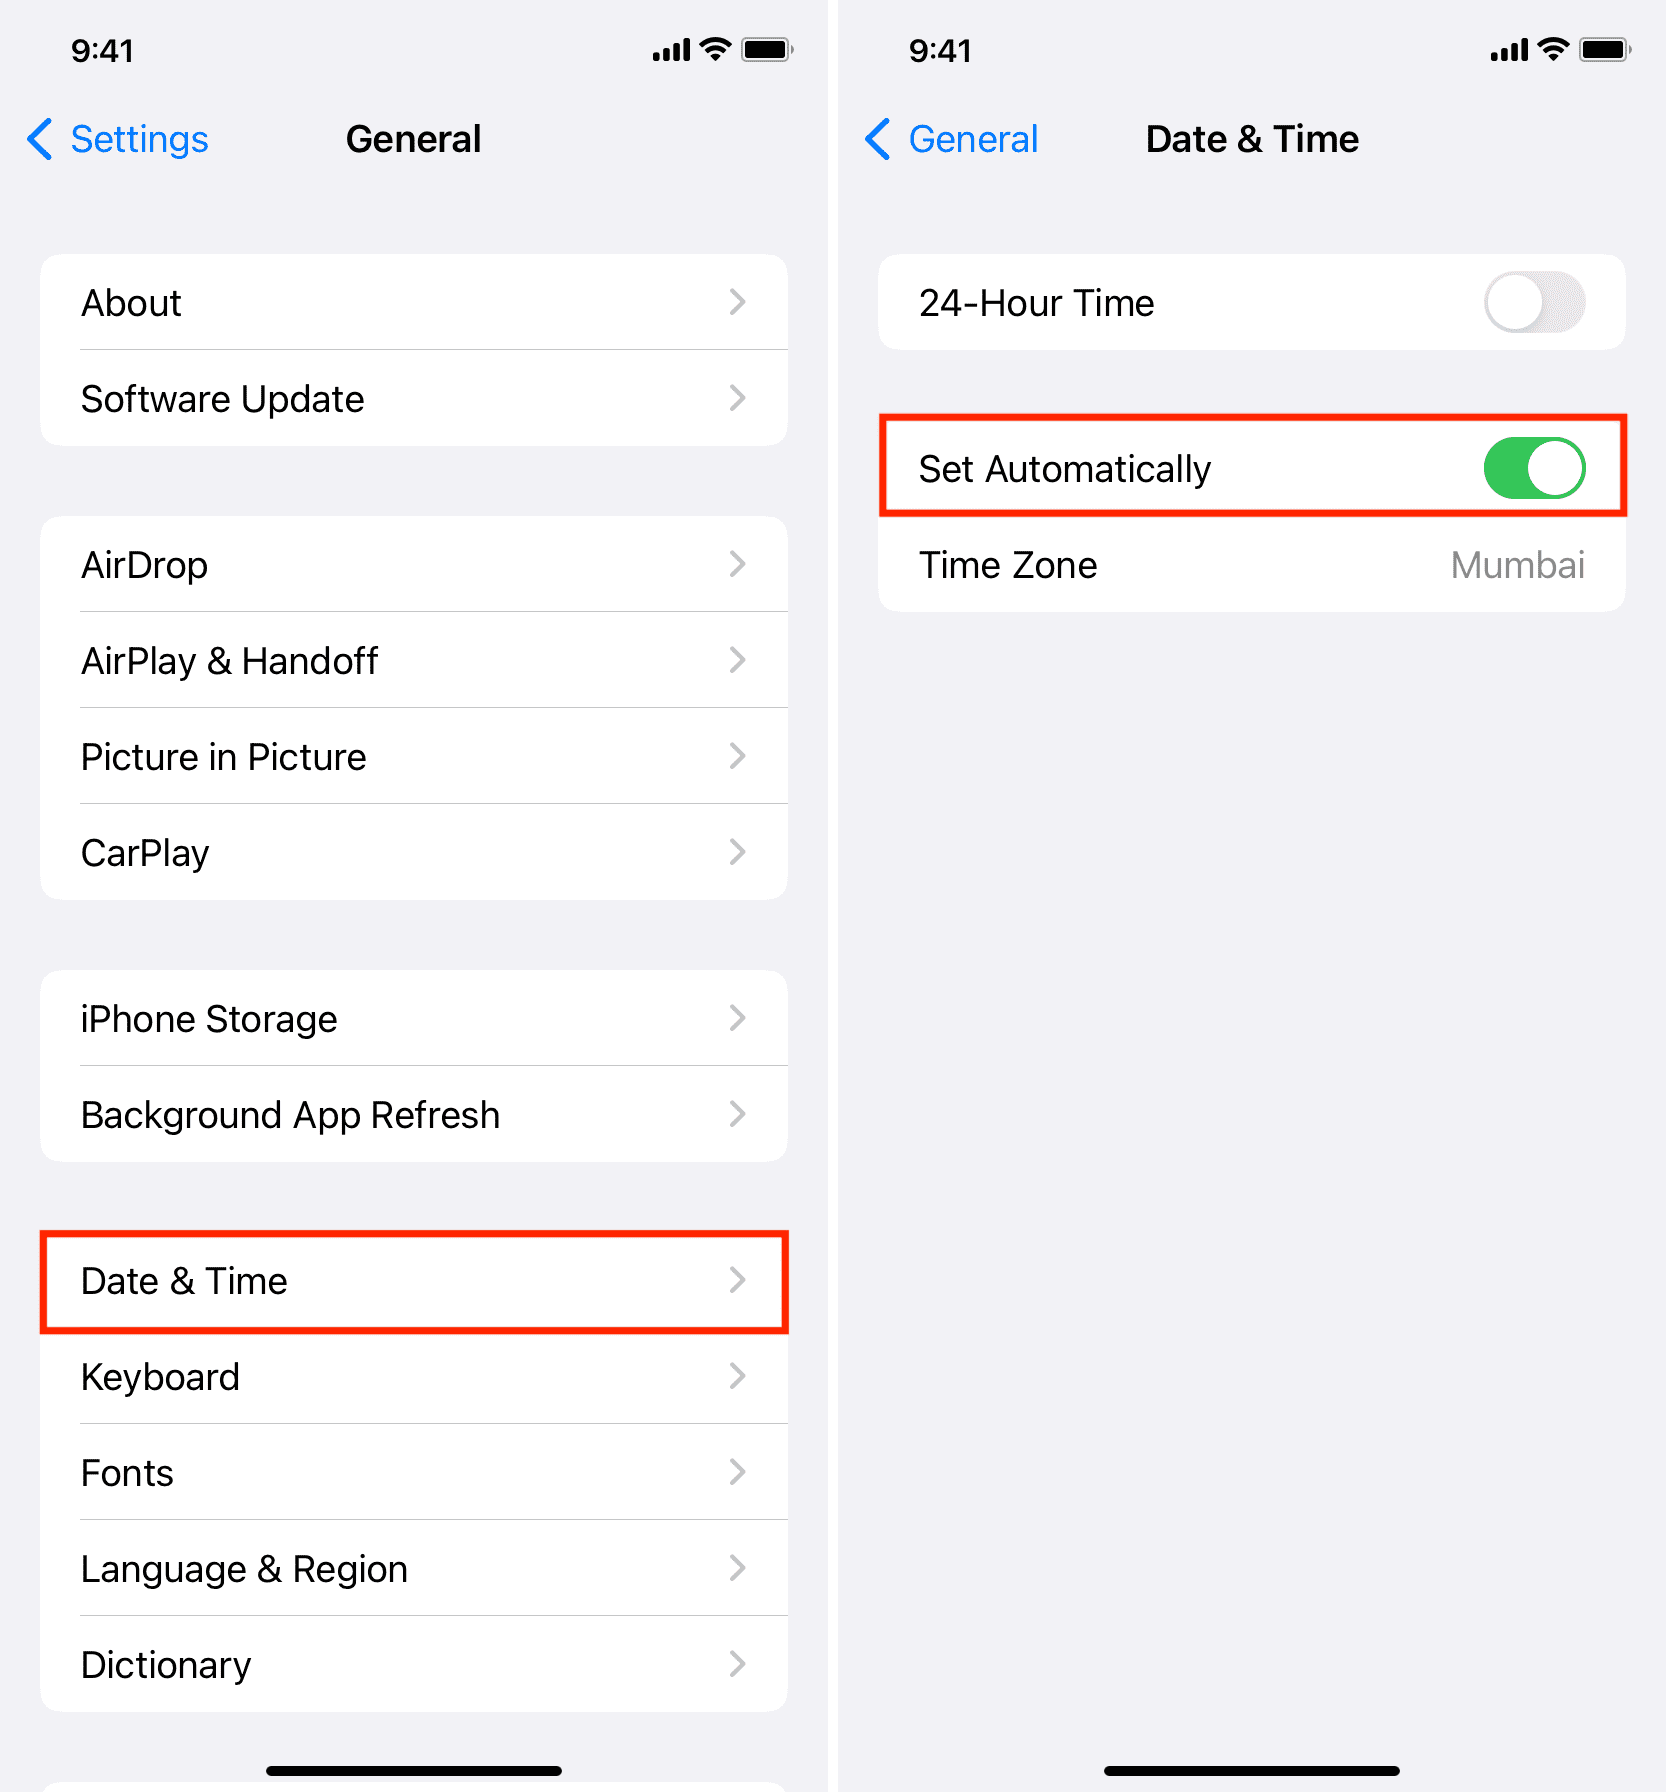
6) ದಿನಾಂಕ ಮತ್ತು ಸಮಯವನ್ನು ಸ್ವಯಂಚಾಲಿತವಾಗಿ ಹೊಂದಿಸಿ
SSL ಪ್ರಮಾಣಪತ್ರಗಳು ಸಮಯ-ಸೂಕ್ಷ್ಮವಾಗಿರುತ್ತವೆ. ತಪ್ಪಾದ ಸಿಸ್ಟಮ್ ಸಮಯವು ಪರಿಶೀಲನಾ ದೋಷಗಳಿಗೆ ಕಾರಣವಾಗಬಹುದು.
ಇದನ್ನು ಸರಿಪಡಿಸಲು, ಇಲ್ಲಿಗೆ ಹೋಗಿ
ಸೆಟ್ಟಿಂಗ್ಗಳು > ಸಾಮಾನ್ಯ > ದಿನಾಂಕ ಮತ್ತು ಸಮಯ
ಮತ್ತು ಸಕ್ರಿಯಗೊಳಿಸಿ
ಸ್ವಯಂಚಾಲಿತವಾಗಿ ಹೊಂದಿಸಿ
.
7) ಸಫಾರಿ ಸಂಗ್ರಹವನ್ನು ತೆರವುಗೊಳಿಸಿ (ಬ್ರೌಸರ್ನಲ್ಲಿ ದೋಷ ಕಂಡುಬಂದರೆ)
ಕೆಲವೊಮ್ಮೆ ಸಮಸ್ಯೆ ಸಫಾರಿಯಲ್ಲಿ ಸಂಗ್ರಹವಾಗಿರುವ SSL ಪ್ರಮಾಣಪತ್ರಕ್ಕೆ ಸಂಬಂಧಿಸಿದೆ.
- ಗೆ ಹೋಗಿ ಸೆಟ್ಟಿಂಗ್ಗಳು > ಸಫಾರಿ > ಇತಿಹಾಸ ಮತ್ತು ವೆಬ್ಸೈಟ್ ಡೇಟಾವನ್ನು ತೆರವುಗೊಳಿಸಿ .
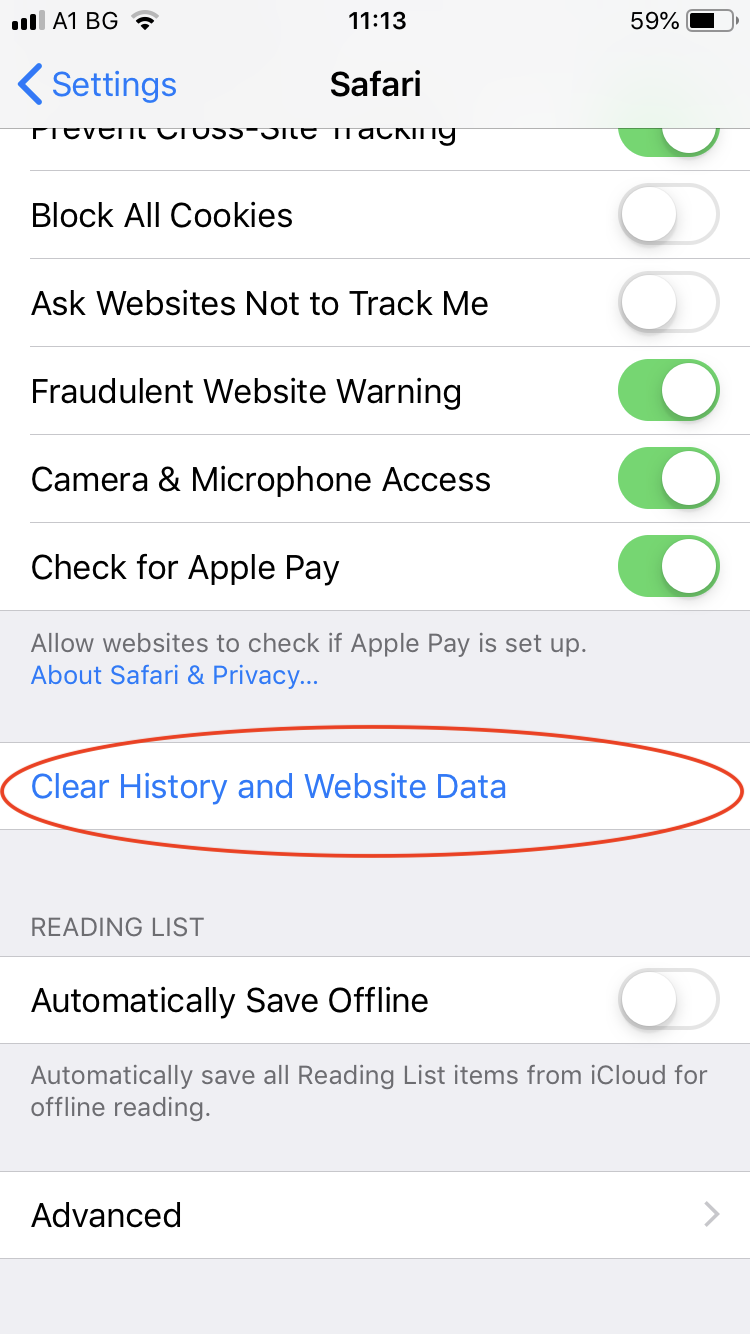
ಇದು ಎಲ್ಲಾ ಬ್ರೌಸಿಂಗ್ ಇತಿಹಾಸ, ಕುಕೀಗಳು ಮತ್ತು ಕ್ಯಾಶ್ ಮಾಡಿದ ಪ್ರಮಾಣಪತ್ರಗಳನ್ನು ತೆಗೆದುಹಾಕುತ್ತದೆ.
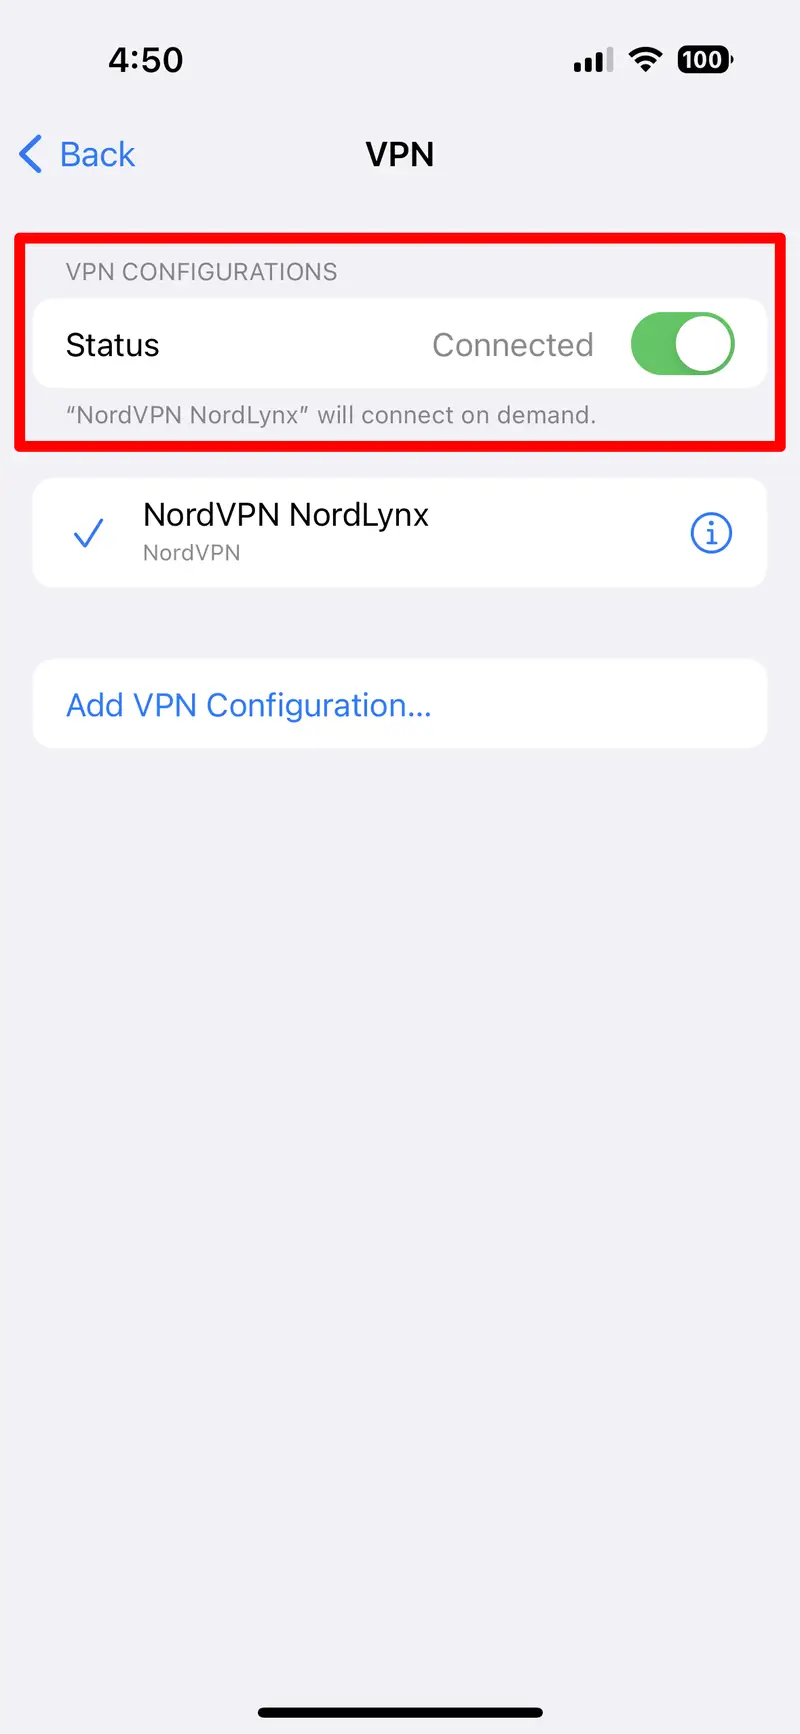
8) VPN ನಿಷ್ಕ್ರಿಯಗೊಳಿಸಿ ಅಥವಾ ಬೇರೆ ನೆಟ್ವರ್ಕ್ ಪ್ರಯತ್ನಿಸಿ
ನೀವು ಸಾರ್ವಜನಿಕ ವೈ-ಫೈ ನೆಟ್ವರ್ಕ್ಗೆ ಸಂಪರ್ಕ ಹೊಂದಿದ್ದರೆ ಅಥವಾ VPN ಬಳಸುತ್ತಿದ್ದರೆ, ಇವು ಸುರಕ್ಷಿತ ಪ್ರಮಾಣಪತ್ರ ಪರಿಶೀಲನೆಗಳನ್ನು ನಿರ್ಬಂಧಿಸಬಹುದು ಅಥವಾ ಮಾರ್ಪಡಿಸಬಹುದು.
ಸಾರ್ವಜನಿಕ ನೆಟ್ವರ್ಕ್ನಿಂದ ಸಂಪರ್ಕ ಕಡಿತಗೊಳಿಸಿ ಮತ್ತು ಮೊಬೈಲ್ ಡೇಟಾಗೆ ಬದಲಿಸಿ, ನಂತರ ಹೋಗಿ
ಸೆಟ್ಟಿಂಗ್ಗಳು > VPN
ಮತ್ತು ಯಾವುದೇ ಸಕ್ರಿಯ VPN ಅನ್ನು ಆಫ್ ಮಾಡಿ.
9) ಪರ್ಯಾಯ ಮೇಲ್ ಅಪ್ಲಿಕೇಶನ್ ಬಳಸಿ
ಆಪಲ್ ಮೇಲ್ ಅಪ್ಲಿಕೇಶನ್ ದೋಷವನ್ನು ತೋರಿಸುತ್ತಲೇ ಇದ್ದರೆ, ಮೂರನೇ ವ್ಯಕ್ತಿಯ ಇಮೇಲ್ ಕ್ಲೈಂಟ್ ಅನ್ನು ಪ್ರಯತ್ನಿಸಿ:
- ಮೈಕ್ರೋಸಾಫ್ಟ್ ಔಟ್ಲುಕ್
- ಜಿಮೇಲ್
- ಸ್ಪಾರ್ಕ್
ಈ ಅಪ್ಲಿಕೇಶನ್ಗಳು ಸರ್ವರ್ ಪ್ರಮಾಣಪತ್ರಗಳನ್ನು ನಿರ್ವಹಿಸಲು ಸಾಮಾನ್ಯವಾಗಿ ವಿಭಿನ್ನ ವಿಧಾನಗಳನ್ನು ಬಳಸುತ್ತವೆ ಮತ್ತು ಸಮಸ್ಯೆಯನ್ನು ಬೈಪಾಸ್ ಮಾಡಬಹುದು.
2. ಸುಧಾರಿತ ಪರಿಹಾರ: AimerLab FixMate ನೊಂದಿಗೆ ಐಫೋನ್ "ಸರ್ವರ್ ಗುರುತನ್ನು ಪರಿಶೀಲಿಸಲು ಸಾಧ್ಯವಿಲ್ಲ" ಎಂಬ ದೋಷವನ್ನು ಸರಿಪಡಿಸಿ.
ಮೇಲಿನ ಪರಿಹಾರಗಳು ಸಮಸ್ಯೆಯನ್ನು ಪರಿಹರಿಸದಿದ್ದರೆ, ನಿಮ್ಮ ಐಫೋನ್ ಆಳವಾದ ಸಿಸ್ಟಮ್-ಮಟ್ಟದ ದೋಷ ಅಥವಾ iOS ಭ್ರಷ್ಟಾಚಾರದಿಂದ ಬಳಲುತ್ತಿರಬಹುದು ಮತ್ತು ಇಲ್ಲಿಯೇ AimerLab FixMate ಬರುತ್ತದೆ.
AimerLab FixMate 200 ಕ್ಕೂ ಹೆಚ್ಚು iOS-ಸಂಬಂಧಿತ ಸಮಸ್ಯೆಗಳನ್ನು ಪರಿಹರಿಸಬಹುದು, ಈ ರೀತಿಯ ಸಮಸ್ಯೆಗಳಿಗೆ ಆಲ್-ಇನ್-ಒನ್ ಪರಿಹಾರವನ್ನು ನೀಡುತ್ತದೆ:
- ಆಪಲ್ ಲೋಗೋದಲ್ಲಿ ಸಿಲುಕಿಕೊಂಡಿದೆ
- ಬೂಟ್ ಲೂಪ್ಗಳು
- ಫ್ರೋಜನ್ ಪರದೆ
- ಐಒಎಸ್ ನವೀಕರಣ ದೋಷಗಳು
- “ಸರ್ವರ್ ಗುರುತನ್ನು ಪರಿಶೀಲಿಸಲು ಸಾಧ್ಯವಿಲ್ಲ” ಮತ್ತು ಅಂತಹುದೇ SSL ಅಥವಾ ಇಮೇಲ್-ಸಂಬಂಧಿತ ದೋಷಗಳು
ಹಂತ-ಹಂತದ ಮಾರ್ಗದರ್ಶಿ: AimerLab FixMate ಬಳಸಿಕೊಂಡು ಐಫೋನ್ ಸರ್ವರ್ ಗುರುತಿನ ದೋಷವನ್ನು ಪರಿಶೀಲಿಸಲು ಸಾಧ್ಯವಿಲ್ಲ ಎಂಬುದನ್ನು ಸರಿಪಡಿಸುವುದು
- FixMate ವಿಂಡೋಸ್ ಇನ್ಸ್ಟಾಲರ್ ಪಡೆಯಲು ಮತ್ತು ಸೆಟಪ್ ಪ್ರಕ್ರಿಯೆಯನ್ನು ಪೂರ್ಣಗೊಳಿಸಲು ಅಧಿಕೃತ AimerLab ವೆಬ್ಸೈಟ್ಗೆ ಹೋಗಿ.
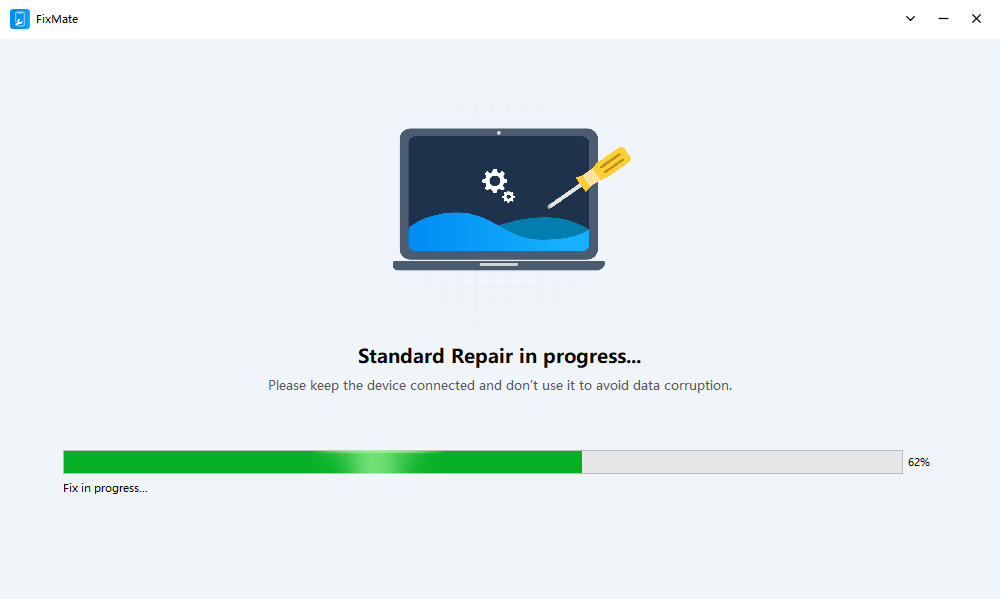
- FixMate ತೆರೆಯಿರಿ ಮತ್ತು USB ಕೇಬಲ್ ಬಳಸಿ ನಿಮ್ಮ ಐಫೋನ್ ಅನ್ನು ಸಂಪರ್ಕಿಸಿ, ನಂತರ ಡೇಟಾ ನಷ್ಟವಿಲ್ಲದೆ ನಿಮ್ಮ ಐಫೋನ್ ಅನ್ನು ದುರಸ್ತಿ ಮಾಡಲು ಸ್ಟ್ಯಾಂಡರ್ಡ್ ರಿಪೇರಿ ಮೋಡ್ ಅನ್ನು ಆಯ್ಕೆ ಮಾಡಿ.
- ಫಿಕ್ಸ್ಮೇಟ್ ನಿಮ್ಮ ಐಫೋನ್ ಮಾದರಿಯನ್ನು ಪತ್ತೆ ಮಾಡುತ್ತದೆ ಮತ್ತು ಸೂಕ್ತವಾದ iOS ಫರ್ಮ್ವೇರ್ ಆವೃತ್ತಿಯನ್ನು ಪ್ರಸ್ತುತಪಡಿಸುತ್ತದೆ, ಪ್ರಕ್ರಿಯೆಯನ್ನು ಪ್ರಾರಂಭಿಸಲು ಕ್ಲಿಕ್ ಮಾಡಿ.
- ಫರ್ಮ್ವೇರ್ ಡೌನ್ಲೋಡ್ ಆದ ನಂತರ, ಸ್ಟ್ಯಾಂಡರ್ಡ್ ರಿಪೇರಿ ಅನ್ನು ಪ್ರಾರಂಭಿಸಲು ಕ್ಲಿಕ್ ಮಾಡಿ ಮತ್ತು ದೃಢೀಕರಿಸಿ. ಈ ಪ್ರಕ್ರಿಯೆಯು ಕೆಲವು ನಿಮಿಷಗಳನ್ನು ತೆಗೆದುಕೊಳ್ಳುತ್ತದೆ, ಮತ್ತು ನಿಮ್ಮ ಐಫೋನ್ ರೀಬೂಟ್ ಆಗುತ್ತದೆ ಮತ್ತು ಅದು ಸರಿಪಡಿಸಿದ ನಂತರ ಸಾಮಾನ್ಯವಾಗಿ ಕಾರ್ಯನಿರ್ವಹಿಸುತ್ತದೆ.
3. ತೀರ್ಮಾನ
ಐಫೋನ್ನಲ್ಲಿನ “ಸರ್ವರ್ ಗುರುತನ್ನು ಪರಿಶೀಲಿಸಲು ಸಾಧ್ಯವಿಲ್ಲ” ದೋಷವು ಅಡ್ಡಿಪಡಿಸಬಹುದು, ವಿಶೇಷವಾಗಿ ಅದು ಪ್ರಮುಖ ಇಮೇಲ್ಗಳು ಅಥವಾ ವೆಬ್ಸೈಟ್ಗಳನ್ನು ಪ್ರವೇಶಿಸುವುದನ್ನು ತಡೆಯುತ್ತದೆ. ಹೆಚ್ಚಿನ ಸಂದರ್ಭಗಳಲ್ಲಿ, ನಿಮ್ಮ ಫೋನ್ ಅನ್ನು ಮರುಪ್ರಾರಂಭಿಸುವುದು, iOS ಅನ್ನು ನವೀಕರಿಸುವುದು ಅಥವಾ ನಿಮ್ಮ ಇಮೇಲ್ ಖಾತೆಯನ್ನು ಮರು-ಸೇರಿಸುವಂತಹ ಸರಳ ಹಂತಗಳು ಸಮಸ್ಯೆಯನ್ನು ಪರಿಹರಿಸುತ್ತವೆ. ಆದಾಗ್ಯೂ, ಈ ಪ್ರಮಾಣಿತ ಪರಿಹಾರಗಳು ಕೆಲಸ ಮಾಡದಿದ್ದರೆ, ಮೂಲ ಕಾರಣ iOS ವ್ಯವಸ್ಥೆಯೊಳಗೆ ಆಳವಾಗಿ ಇರುವ ಸಾಧ್ಯತೆಯಿದೆ.
ಅಲ್ಲಿಯೇ AimerLab FixMate ಅಮೂಲ್ಯವಾದುದು ಎಂದು ಸಾಬೀತುಪಡಿಸುತ್ತದೆ. ಅದರ ಸ್ಟ್ಯಾಂಡರ್ಡ್ ಮೋಡ್ನೊಂದಿಗೆ, ನೀವು ಒಂದೇ ಒಂದು ಫೋಟೋ, ಸಂದೇಶ ಅಥವಾ ಅಪ್ಲಿಕೇಶನ್ ಅನ್ನು ಕಳೆದುಕೊಳ್ಳದೆ ದೋಷವನ್ನು ಸರಿಪಡಿಸಬಹುದು. ಇದು ವೇಗವಾಗಿದೆ, ವಿಶ್ವಾಸಾರ್ಹವಾಗಿದೆ ಮತ್ತು ಪ್ರಮಾಣಿತ ದೋಷನಿವಾರಣೆಯು ಮುಟ್ಟಲಾಗದ ದೋಷಗಳ ಪ್ರಕಾರಗಳನ್ನು ನಿರ್ವಹಿಸಲು ನಿರ್ದಿಷ್ಟವಾಗಿ ವಿನ್ಯಾಸಗೊಳಿಸಲಾಗಿದೆ.
ನಿಮ್ಮ ಅತ್ಯುತ್ತಮ ಪ್ರಯತ್ನದ ಹೊರತಾಗಿಯೂ ನಿಮ್ಮ ಐಫೋನ್ ಸರ್ವರ್ ಗುರುತಿನ ದೋಷವನ್ನು ಪ್ರದರ್ಶಿಸುತ್ತಿದ್ದರೆ, ಒತ್ತಡದಲ್ಲಿ ಸಮಯ ವ್ಯರ್ಥ ಮಾಡಬೇಡಿ - ಡೌನ್ಲೋಡ್ ಮಾಡಿ
AimerLab FixMate
ಮತ್ತು ಅದು ನಿಮ್ಮ ಐಫೋನ್ನ ಕಾರ್ಯವನ್ನು ನಿಮಿಷಗಳಲ್ಲಿ ಪುನಃಸ್ಥಾಪಿಸಲು ಬಿಡಿ.
- ನನ್ನ ಐಫೋನ್ನಲ್ಲಿ ನನ್ನ ಫ್ಲ್ಯಾಶ್ಲೈಟ್ ಏಕೆ ಕೆಲಸ ಮಾಡುವುದಿಲ್ಲ?
- "ಅಪ್ಗ್ರೇಡ್ ಮಾಡಿದ ಐಫೋನ್ ಅಥವಾ ಈಗ ಐಫೋನ್ ಮಿರರಿಂಗ್ ಕಾರ್ಯನಿರ್ವಹಿಸುತ್ತಿಲ್ಲ" ಎಂಬ ಸಮಸ್ಯೆಯನ್ನು ಹೇಗೆ ಪರಿಹರಿಸುವುದು?
- ಐಫೋನ್ ದೋಷ 75 ಅನ್ನು ಹೇಗೆ ಪರಿಹರಿಸುವುದು?
- iPhone iOS 18 ನಲ್ಲಿ ಪಾಸ್ವರ್ಡ್ಗಳನ್ನು ಕಂಡುಹಿಡಿಯುವುದು ಹೇಗೆ?
- ನನ್ನ ಐಫೋನ್ ಏಕೆ ರಿಂಗ್ ಆಗುತ್ತಿಲ್ಲ? ಅದನ್ನು ಸರಿಪಡಿಸಲು ಈ ಪರಿಣಾಮಕಾರಿ ಪರಿಹಾರಗಳು
- ನನ್ನ ಐಫೋನ್ ತಪ್ಪಾದ ಸ್ಥಳವನ್ನು ಕಂಡುಹಿಡಿಯುವುದನ್ನು ಹೇಗೆ ಸರಿಪಡಿಸುವುದು?
- ಐಫೋನ್ನಲ್ಲಿ ಪೋಕ್ಮನ್ ಗೋವನ್ನು ವಂಚಿಸುವುದು ಹೇಗೆ?
- Aimerlab MobiGo GPS ಸ್ಥಳ ಸ್ಪೂಫರ್ನ ಅವಲೋಕನ
- ನಿಮ್ಮ iPhone ನಲ್ಲಿ ಸ್ಥಳವನ್ನು ಹೇಗೆ ಬದಲಾಯಿಸುವುದು?
- iOS ಗಾಗಿ ಟಾಪ್ 5 ನಕಲಿ GPS ಸ್ಥಳ ಸ್ಪೂಫರ್ಗಳು
- GPS ಸ್ಥಳ ಫೈಂಡರ್ ವ್ಯಾಖ್ಯಾನ ಮತ್ತು ಸ್ಪೂಫರ್ ಸಲಹೆ
- Snapchat ನಲ್ಲಿ ನಿಮ್ಮ ಸ್ಥಳವನ್ನು ಹೇಗೆ ಬದಲಾಯಿಸುವುದು
- iOS ಸಾಧನಗಳಲ್ಲಿ ಸ್ಥಳವನ್ನು ಹುಡುಕುವುದು/ಹಂಚುವುದು/ಮರೆಮಾಡುವುದು ಹೇಗೆ?